HOW TO PERFORM A REVERSE TELECINE ON PROJECTS EDITED IN 29.97 (AND TURN THAT UGLY 4X3 LETTERBOX INTO A BEAUTIFUL NATIVE 16X9 IMAGE):
–There may be a better way to do this, but I wanted to be 100% sure to avoid any issues with interlaced frames and this worked great (unlike the lazy way which involves just exporting your edited film in Compressor with my preset that can be downloaded here:
The sequence of your final edit will be referred to as, SEQUENCE.
1. Duplicate your SEQUENCE (do this by CTRL+CLICKING on it and choosing “Duplicate” in the drop down menu).
2. Rename the copy something like “SEQUENCE wFades“. We will leave this untouched for nostalgia.
3. Open the newly created “SEQUENCE wFades“, Mark your In and Out points at the start and end of your timeline and then hit COMMAND+E to export QuickTime movie. Use CURRENT SETTINGS, Include AUDIO AND VIDEO, and check the box “MAKE MOVIE SELF-CONTAINED“. Remember where you save it, because we’ll need it in step 14.
4. Go back to the original SEQUENCE and remove all fades and dissolves from timeline.
5. If your project has dissolves, be sure to drag out the corresponding heads and tails of your clips so you have the frames necessary to rebuild the transitions.
You now have 2 choices. If you choose 6a, then you don’t have to do 6 (but 6a is more time consuming, so if you have lots of cuts in your sequence, then 6 is less cumbersome).
6. Go to each edit point and be sure that none of your edits fall on duplicated frames. If you have my luck, then several of them will. As its always safer to have too many frames than too few, add another frame to the clip.
OR
6a. If you want to avoid having to go back to your SEQUENCE to re-export any individual clips that may have missing frames at the head or tail of them, then do this: Add 4 frames to the heads and tails of every clip (in addition to any extra frames needed from step 5).
7. CTRL+CLICK on the SEQUENCE in your Browser window and choose “Settings…” in the drop down menu. Change your COMPRESSOR to APPLE PRORES 422(HQ) in the QUICKTIME VIDEO SETTINGS section.
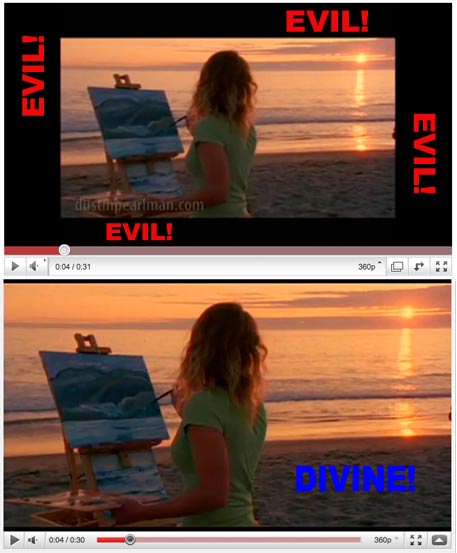
If your project is already in the correct aspect ratio, then Click OK and proceed to step 11. If you have non-16×9 enhanced footage and want it to fill up your fancy HDTV and YouTube’s new widescreen media player instead of having your film both letterboxed and pillarboxed (which is an offense that should be punishable by death), then we still have work to do:
8. While in the Settings menu, Click on the button for “ANAMORPHIC 16:9“. Click OK.
9. If possible, remove any hard mattes that you have on your footage (you probably used the WIDESCREEN filter in the Effects menu). If you used the filter to make any headroom adjustments, then open up your frame wide enough that it won’t be in the final movie. For example, I had a film that was masked to 1.85:1, so I changed the filter to 1.70:1 to be sure I’m clear of it. Doing so will slightly change your offset adjustment, so be sure to compensate for that. If your mask is 2.35:1, then you can worry about headroom later in the process.
10. Depending on your film transfer, you may need to get fancy/experimental with these settings, but technically by going into the Motion menu on your first clip and making the SCALE 133 in the BASIC MOTION section and changing the ASPECT RATIO in the DISTORT section to 33.33, you will have a perfectly scaled clip. I was not so fortunate. I needed to push in further to get rid of mattes on the sides of the frame. I never had to go further than 134 on the scale and often found that by changing the X-value (the first number after the “+” button) on the CENTER section of BASIC MOTION allowed me to more easily get the sides clean without scaling too aggressively. Remember that you aren’t limited to whole integers. It’s fun to see how precise you can be. For example, Scale of 133.5 and a Center of -1.3 was the right combo for some of my lab rolls.
11. Mark your In and Out points to include the entire timeline (it should be at least a little bit longer than before) and CNTRL+CLICK on the SEQUENCE in your Browser and choose SEND TO –> COMPRESSOR.
12. Download my Compressor preset if you haven’t already. Locate the file and drag and drop it directly into your SETTINGS bin in COMPRESSOR. Now drag my preset “ProRess Reverse Tele” onto your SEQUENCE in the panel marked UNTITLED just like you would any other preset. SUBMIT and grab a beer or three depending on your mac’s processor(s) speed and project length.
13. Create a new SEQUENCE for your newly created 23.98 Quicktime movie. Let’s call it “SEQUENCE 2398“. Locate the Quicktime and drag it onto the new timeline on video track 1. If you are running FCP 6.0 or later (which you need to be in order to use Prores compressor), then it will ask you if you want to “Change Sequence to match the clip settings“. This is such a great update. Choose YES.
14. Locate the Quicktime that we exported in step 3 and overlay it onto your timeline on video track 2.
15. If you want to have a 1.85 matte or 2.35 matte, then you should do so now with the WIDESCREEN filter.
16. Time to rebuild your edit: complete with fades and dissolves. If you chose step 6a, this is going to take a while. You are going to need to spot check that you are perfectly in sync. To do so, I recommend placing markers on each video track where something frame specific is happening. Something like the frame just before a door closes. Using CNTRL-B is very useful because it turns on and off the selected track. This allows you to see if the clips are lined up properly. CNTRL-V is very useful in making the cuts onto the clips on your timeline (sometimes you will have to hit it twice in order to get cuts on all the tracks of video/audio).
17. If you want to address any headroom concerns, now is a good time, because we are done! Congratulations.
I wish there were a simpler way to do this. If there is, then please share in the comments section! Thankfully all the projects I did this to were short and not-so-cutty… If you wondering why I spent so much time doing this, read more.


Leave a reply